The “Ivory Boom” of the Mid-1800’s

What better way to celebrate Independence Day than to write about the ingenuity of the U.S. inventors and things that can go boom?

So what do you get when you mix alcohol, testosterone, gambling and gunpowder? A saloon. Now ­ mix in spherical ivory alternatives that strike each other and what do you have? You have a crowded saloon.

In the mid-1800’s a $10,000 reward was raised by Phelan & Collander, one of the largest billiard ball manufacturers for the first usable ivory alternative. John Wesley Hyatt, most likely spurred by this, not only came up with an alternative, but also created processes that would create perfectly round billiard balls. (Site down for maintenance as of the writing of this article, see the “wayback machine” for an archived version of this)

Celluloid was one of the first plastics to be used in place of elephant ivory. The Hyatt Manufacturing Company created billiard balls that were similar to the size weight and resilience of their elephant ivory counterpart. Unfortunately the chemical composition of these new billiard balls had a couple of downsides: they were extremely flammable, exploding with the sound of a gunshot when a careless cigar or ash came in contact with them (there are stories of everyone in the saloon drawing their guns due to this fact), and they would form a paper thin skin that dust and dirt would adhere to. By mixing camphor in with the ground cellulose nitrate and adding heat, they were able to make a more stable compound.

Celluloid from this period was used to make many items that were popular in the day which tortois, ivory and wood were made of, including dolls, toys, handles for every conceivable item including razors, combs brushes and more. It was also useful as an alternative to ivory in the luthier trade.

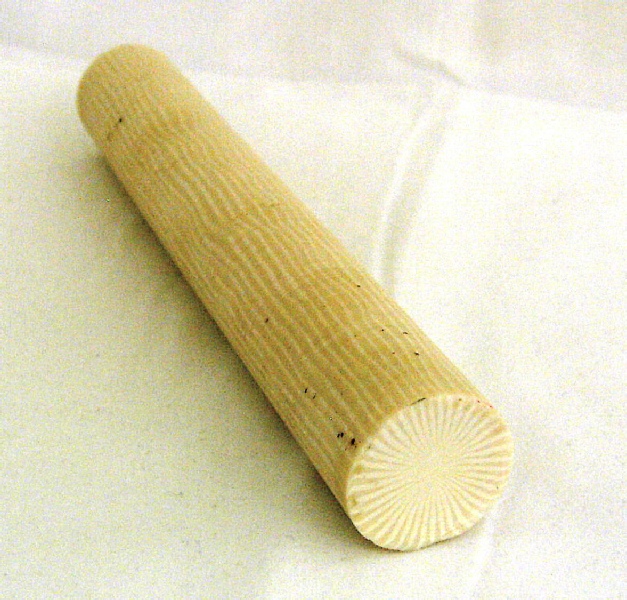
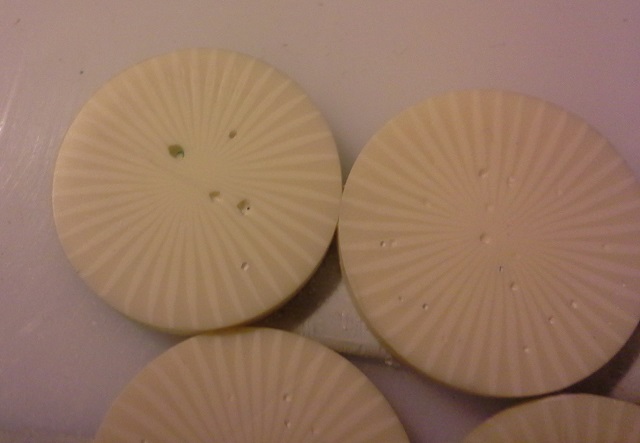
Today, celluloid nitrate is still available but it is considered a hazardous material due to it’s flammable nature. You can find it in various forms from 0.020” thick to 0.25” thick.

It’s flashpoint is 165 degrees C (329 degrees F).

You can still get this material if you wish from Axiom, Inc.

http://www.axinc.net/Celluloid_Nitrate_Sheets_s/74.htm

Posted in FYI

Ivory Alternative: Tagua Nut

Ivory Alternative: Tagua Nut

A Renewable Resource You May Already be Wearing

tagua nut sliceTagua nuts have a varied history for the west, acting as a ballast medium for ships setting sail from South America*. This material has been popular for a long time as a substitute for ivory and has been making a comeback as a material for buttons and jewelry.  It’s also used for making carvings such as netsuke and other small adornments.  Tagua was used by the US Army during World War II for uniforms, gradually being replaced with plastics afterward.

What Is Tagua Nut?

Tagua nut is the seed of a palm known as Phytelipas Aequatoralis, it does have a distant cousin in the Solomon Islandsknown as ivory nut and Metroxylon amicorum from the Caroline Islands of Micronesia, as well as Hyphaene ventricosa from the Zambezi River of Africa*.  Tagua nut is the most plentiful and accessible. It is a dense seed that is dried then either cut or sometimes sanded and polished as is and can be found on Amazon.com.

As a wood, it is one of the densest around and inside, it has a challenging secret: there are almost always voids, so acquiring a tagua nut with the intent of slabbing it will end in a lot of waste and frustration.  On the upside, you can get them pre-cut with slabs or “potato chips” in thicknesses from 1/8″ to almost 3/8″ (3.2mm to 9.5mm).

Scrimshaw and Tagua Nut

Tagua nut polishes to a high luster and looks like a great substitute at first, and can be as long as you follow a few guidelines:

  • Sand and polish to at least 3000 grit starting at about 150 grit, first in one direction, then perpendicularly when you move to the next finer grit (up and down for 150 grit, back and forth for 300 grit, up and down for 600 grit, etc.)
  • Let it sit between steps for at least one day.  Sanding to about 1000 grit  will heat the wood making it expand slightly. If you are using machines it will probably heat it up even more (we always rough sand flat, wait a day, then progressively sand to 600 grit, wait one day, then do the final sanding to 3000 grit).
  • As you will see, HUT Wax applied with a felt wheel has given us the best results so far (yes, wait one day, polish, wait one day, then scrim)
  • India ink has a tendency to stain, using oil paint and wiping it off wet is the best way to make your scrimshaw appear.
  • Scrimshaw everything first – repeated coatings of pigments will get under even some of the best coatings and stain the micro-pores within the tagua nut. This can be tricky if you’re first starting out scrimshawing, but it will yield the best results.

A fine (000) paint brush and careful application will allow you to fill in darker areas but at this point you will need to paint carefully and let the paint dry completely, don’t try to wipe it off, since you can’t repolish once you’ve scrimshawed.

Another way around the micro-pores issue is to send your material out to have it stabilized, or stabilize it yourself.  There are several YouTube videos that show people stabilizing their own using vacuums and MinWax wood restorer.  We tried this and found the distillates disintegtrated the latex seals quickly making a sticky smelly mess (it did take a couple of days for this to occur, it wasn’t minutes), and the creamy white tagua nut turned an antique yellow.  We’ll continue to experiment, but you may also want to try sending some samples to businesses that specialize in stabilizing wood and antler.

One other idea that looked good on paper that didn’t work was to spray the tagua nut with spray varnish.  This left a film that was difficult to scrim, peeled, and ended up unsuitable.

Summary

Tagua nut can be a good eco-friendly substitute for ivory as long as precautions are taken and a commitment to scrimming once, then patiently rescrimming and only filling in the re-scrimmed areas with a small brush.

Tagua nut with India ink (top) and oil paint (bottom) applied with no scrimming
The same tagua nut that India ink and oil paint were on, wiped it away. The India ink left a stain.
Wiping away after the ink dried (the oil paint still wet) the India ink left a stain.
Polished tagua nut (center), HUT wax bar (top) and dremel felt wheel (bottom left)
Second tagua nut sample polished and buffed with HUT Wax, then left to sit for one day.


"OIL" scribed into tagua nut and oil paint applied then wiped away.
Tagua nut polished with HUT wax under a microscope after wiping away oil pigment.
Tagua nut under the microscope after polishing with HUT wax and india ink applied to the scribe lines. The ink penetrated the tagua creating a stained area.
Clicking on the picture will show you the staining in the micro-pores of the tagua nut by the India ink
Rose on Tagua Nut using Oil for the initial black and India Ink for the color. Test scribes below the rose
Rose on Tagua Nut using Oil for the initial black and India Ink for the Color

Casein – The “New” Old Plastic for Scrimshaw

Casein Rod by John BerkelyWe’ve been testing a “new” old ivory alternative called “casein”.

This is a plastic made from milk.  You’ll find many DIY articles on the net and usually people say “meh.” when they’re finally done, but this was a common alternative at the turn of the last century through about the 1970’s in western Europe. We were able to get a couple of samples from “across the pond” and it’s quite interesting.  Extremely dense, polishes beautifully and doesn’t “crater” like typical plastics. We got our samples as rods, mostly used to cut buttons or to turn on a lathe, and went about cutting medallions. It took a long time to cut through it, and the dust is awful – it stays airborne a long time and due to the way it’s made, you’ll definitely want to upgrade your dust masks. Plain casein plastic is made from milk as stated.  In order to make it resilient casein is subjected to a formaldehyde bath for up to one year depending on the thickness where the formaldehyde molecules bind with the casein making it harder and more resilient.

The casein is  finally rinsed and dried, most of the harmful chemical leaving the end product by off-gassing and repeated rinsing. Ford at one point had experimented making a “plastic car” substituting casein based plastics with soybean and hemp based plastics (see “Henry’s Hobbies“, pg 283).

By the looks of http://pubs.acs.org/doi/abs/10.1021/ie50459a024 the amount of formaldehyde would be negligible for normal handling, but there are no MSDS for this material available that we’ve been able to find, so it is far better to be safe than sorry.

They still make casein plastic knitting needles, and it’s supposed to be some of the finest knitting needles available.

casein medallion cut too thin warps over time.
If you cut casein too thin, it can warp over time. 3/16″ seems fine.

Instead of formaldehyde, companies are creating casein plastic successfully using “glyceraldehyde” which is not considered harmful by OSHA (see http://datasheets.scbt.com/sc-300881.pdf).

We’re probably not going to see this material processed either by formaldehyde or glyceraldehyde any time soon because it can take up to one year for it to be ready, but our source for the casein we’ve been working with is listed at the end.

As stated, casein itself only takes a day or so to make and dry, but it does have to soak for a long time in the fluid for it to permeate completely.  Any DIY’ers out there may be able to make a small side business offering cabachons or possibly knife scales provided the total thickness is less than 1/2″  If you look around etsy you can see a lot of vintage casein buttons as well as other useful items that were once made from this material (see Instructibles for the one of many articles on creating your own plastic).

We’ve also come across an “alternative casein” available for turning and possibly for scrimshaw but we haven’t purchased any yet, and are unsure what the “alternative” is: whether it’s an acrylic or polyester made to look like casein or if it’s a “green” casein made from glyceraldehyde. It’s available from “Exotic Blanks” .


Owl on casein in progressSo how well does it scrim? It works great for both line scribing and for stippling. The only problem we found with our samples were small air holes in the faces we’d cut.  These would vary from few to numerous, most of them very small and could be incorporated into the scrimshaw design or a “squirt and fill” may also work using a cyanoacrylate glue (crazy glue) and some of the powder from cutting which is a popular way to fill voids in other materials. We found our best piece and scrimmed an owl which you can see in progress.  We followed tried coloring the back of the template and piercing the paper once it was secured and it worked quite well.

Owl on casein medallion in progressMost of the owl is done in the stipple technique, though we tried a few lines going “dot-to-dot” on the upper right hand side of the owl’s head.  Very little cratering, and the material holds both ink and aquarelle black pencil well.


We’d like to find this material in sheet form at 3/16″ thickness, and if you come across a supplier, please let us know.

Owl on Casein - finished


voids shown in some casein medallions
Some typical pitting or voids found when casein rod is cut into medallions

Casein in rod form is available from http://www.johnberkeley.biz/page15.html


Further reading on Casein Formaldehyde: Green Plastics: An Introduction to the New Science of Biodegradable Plastics 

Scrimshaw on Sale: Mammoth Ivory Ship Temporary Price Drop

Jason R. Webb's "Whaling Bark" Scrimshaw on ancient mammoth ivoryScrimshaw on sale: One of Jason R. Webb’s premier works of art is taking a temporary price drop!

Jason’s “Whaling Bark”, a scrimshaw of the C.W. Morgan was entered in the 2013 International Scrimshaw Competition and stood up well against some incredible competition.  

Jason’s style is unique in the world of scrimshaw.  Using both scribe lines and stipple, Jason is able to create the subtle texture of the canvas on the sails and the texture of the wood of the ship, along with an excellent frothing sea that fades gracefully toward the bottom yet still reflects the mast. Using sweeping scribe lines the sails billow and the salt water splashes against the side of the ship. Taking four months to complete, this is one of his first ships on rare mammoth ivory. Standing five inches tall (12.7cm) it is mounted on a rich dark wood base.  The back of the piece is signed and dated by the artist.

Jason’s original private sale price was $1500, but he is putting his scrimshaw on sale for $999 to help defray costs of his move to a larger place so he and his new family will have room to grow.  This magnificent piece is on ancient mammoth ivory as evidenced by the Schreger lines on the base, and is legal for sale worldwide.

Once Jason has moved, this piece will likely return to the original price, so act fast. Contact Jason at jasonwguitar@gmail.com

See this one of a kind piece from start to finish: “Whaling Bark”

Buffalo Scrimshaw on Paper Micarta


Paper Micarta

Paper micarta - scrimshaw buffalo on slab, on top of thick cut paper micarta sheetPaper micarta is a composite material made from layers of paper and thermosetting plastic. There are other micartas as well, such as linen micarta and canvas micarta where they mix layers of linen or canvas. These materials are great for knife handles but interferes with scrimshaw since the materials are so thick, and they will wick the pigments. Another micarta like material uses fiberglass (called G10). It is extremely dense and stiff, unlike the Alternative ivory posted in a previous article.

Some people create their own micarta from old denim or paper and epoxy, pressing the materials under as much pressure as they can until dry, then cutting away any excess. This can be a messy and time consuming endeavor (see http://www.instructables.com/id/How-to-make-homemade-micarta/).

Paper micarta is mainly available as ivory, white or black. If you want to create an unique design, you may want to create a deep blue paper micarta and use a white pigment. This is in my bucket list, about the 17th in the line, behind the rest of the overflowing buckets…

Cutting paper micarta requires extremely sharp blades. Another thing you must use is a respirator rated for formaldihyde! This stuff smells terrible, and good ventilation is required as well. Cutting slow, especially with fretsaw blades will allow you to cut intricate patterns in just about any shape.  Read through the Material Safety Data Sheet (MSDS) so you know what you are working with. see: http://www.tmxaerospace.com/wcm/idc/groups/internet/documents/web_content/mdaw/mdi5/~edisp/dw022352.pdf for an example, and request a MSDS when you buy.

Paper micarta sands easily, files work well also. Once cut, shaped and wiped clean, paper micarta can be coated with a couple of coats of wood hardener from Minwax, though for this tutorial we’re trying renaissance wax. Polishing up to 3000 grit is highly recommended also (note: if you’re sealing the micarta with minwax wood hardener, polish it with 3000 grit after it has dried; if using renaissance wax, polish it before, apply the wax, then wipe away the excess renaissance wax with a soft cloth).

Most modern paper micarta is of high quality, though if the material is going to be used on a knife handle that will be getting wet, we’d definitely recommend sealing it.

Stipple and scratch, with callout where paper filaments have pulled awayPaper micarta has a similar hardness to ivory, though we have found that it can stain slightly when using pigments due to its texture. We used a stipple technique on the bison using a Coulter scrimshaw scribe and found the material makes slight craters, not unlike softer mammoth ivory [photo]. It takes fine stippling well, and you can create dark areas with little difficulty.

When it comes to scribing, paper micarta comes up short. The filaments of the paper will pull out making the edges of the lines slightly blurry. Clicking on the picture will bring up a larger image.

A very sharp stippling tool works best with paper micarta. If you are doing bolder lines and wish to scribe we’d recommend trying an X-acto type blade that is stropped so it will cut through the paper filaments instead of pulling them out, though we have not worked with this blade personally.

You can find paper micarta at Masecraft Supply in sheets, blocks and rods, as well as many of the knifemaker’s supply houses like USAKnifemaker, Texas Knife Supply, etc.

A good alternative to ivory, especially when it comes to stipple technique. Paper micarta can replace ivory as well as horn for knife handles as well as jewelry pieces. Similar hardness to ivory, it’s only drawback is when it comes to scribing technique where the paper filaments tend to pull and create fuzzy lines instead of clean lines. Takes ink well, oil paint also works – we applied it and immediately wiped it off with no staining if the surface was polished smooth.

Below is a series of pics of a scrimshaw in progress of a buffalo on paper micarta.  We’re using the stipple technique to keep the image sharp.

buffalo template from "scrimspirations Book 1"
Paper micarta under the second buffalo, the back of the paper is scribbled with a china marker to make the stipple dots show up easier
Paper lifted up once the stippling was completed. Lit from behind.
Stippled buffalo on paper micarta.
Buffalo template from "Scrimspirations Book 1". Photo Credit:USFWS with the piece of paper micarta on top.
Buffalo template from “Scrimspirations Book 1”. Photo Credit:USFWS
Stippling of the Buffalo in progres on paper micarta.  Hind portion outline stippling completed, front portion not finished.
Stippling of the Buffalo in progress (okay, technically an American Bison).
Penny to the left, Bison scrimshaw on paper micarta to the right.
Scrimshaw of Bison (in progress) with penny shown for scale. Looks like President Lincoln is sweating a little…
Light angle shows the slight "cratering" from the stippling technique.Light and close stippling on the "beard" shows far less cratering.
Light angle shows the slight “cratering” from the stippling technique.Light and close stippling on the “beard” shows far less cratering.
Buffalo scrimshaw on paper micarta in progress
Playing with textures on the buffalo. Started with stipple, but the tufts presented a challenge for technique and patience.
Finished Buffalo on Micarta next to quarter on left
Finished, except for replacing the gold loop with silver (when they arrive) and signing the back. Cutting a finished piece out of a rough is not for the faint of heart – or the impatient!